Hiển thị các bài đăng có nhãn recycling. Hiển thị tất cả bài đăng

Thứ Hai, 26 tháng 9, 2011

Recycling paper: How to Make Book Page Medallions / Rosettes

Book Page Medallion Craft

This craft is part of the 13 Days of Halloween project. Download number templates for the project, as well as the bug template for Day 3, in the tips and supplies post. Links to all of the crafts from this project can be found in the main 13 Days of Halloween post.
Medallions, rosettes, accordion fold circles … whatever you call them, they’re a neat detail that you can use as everything from ornaments to gift embellishments. I love the look of old book pages in this craft, but you can use any paper that you’d like. I would recommend a text weight paper, as opposed to cardstock, since it’s easier to bend and fold.
 Recycling paper:  How to Make Book Page Medallions / Rosettes

Book Page Medallions

Supplied Needed
a book page or pages
a ruler
a pencil
a hot glue gun
a 1″ circle or square of cardstock
glue dots or double-sided tape


Instructions
1. Cut a 1″ wide by 11 1/2″ to 12″ long strip from the book page. You may have to use multiple strips, which you can connect together using glue dots or double-sided tape. Lay the strip flat, and using a ruler and pencil, mark the edge of the paper every 1/4″.
2. Fold the paper in an accordion fold, using the pencil marks as your guide. When finished, connect the two loose ends together using glue dots or double-sided tape, forming a circular shape. Add hot glue to a 1″ circle or square of cardstock.
3. Immediately place the piece of cardstock over the center of the back side of the medallion. Hold in place (watch your fngers – that glue is hot!) for 30 seconds or so, until the glue begins to cool and the cardstock is firmly attached.
4. Add the calendar number to the front of the medallion using glue dots or double-sided tape.

Recycling paper for holiday: Awesome Paper Cone Wreath Tutorial

Today I am going to give you a very detailed, step by step tutorial on how to make this wreath.  In fact sorry if it almost feels like paper cone wreath making for dumbies, but I have had a lot of questions about this wreath so I am just trying to cover all my bases.

Thứ Tư, 21 tháng 9, 2011

Recycling paper and arts: 9 Incredible Book Sculptures


Recycling paper and arts: 9 Incredible Book Sculptures


Some folks freak out everytime they see some traditional form of media made into something else - books, vinyl records, and the like. As someone who has altered these things into many a how-to project, I constantly recieve comments about how "sad it is that books are no longer valued" or "instead of ripping up albums, try listening to them." Folks, my entire home is filled with books. And records. And lots of old furniture, plenty of heirlooms, and even a few cassette tapes. I get it. But, not all old things are worth saving.
Or, better yet, sometime a thoughtful transformation proves the everlasting value of historic media. Honors it in a unique way that doesn't say, "This is old, so I'm gonna turn it into something else," but "this is awesome, and I want it to participate in a work of art, or be echoed throughout my home."


On that note, GammaSquad has assembled nine seriously awesome book sculptures. I know there are lots more of these out there.

Thứ Ba, 20 tháng 9, 2011

Unique clock for your home: recycling paper ideas

http://g-cdn.apartmenttherapy.com/1165507/022210mcclock-01_rect540.jpg  
how to make a clock from junk mailhome


What You Need

Materials:
  • approximately 24 sheets of junk mail: this can be magazine sheets, grocery store ads, newspaper, whatever you'd like, as long as they are all the same size
  • pen or pencil used for rolling guide
  • scissors
  • tape (invisible works best)
  • long needle (a yarn needle works best)
  • embroidery floss
  • two clear CDs (the kind that protect your CD 50 packs)
  • round cardstock circle with hole punched in middle
  • battery-operated clock mechanism with hands

Instructions

1. To make a clock, 24 of these tubes will have to be created. Start by taking your pencil or pen, and use it as a guide to roll up your sheet of paper around it.
2. Tape each end of the tube with preferably invisible (matte clear) tape.
3. Fold approximately one third of the tube towards the other end, as shown above. As mentioned before, you will make about 24 of these, and its pointed tapered end will help create the round effect needed for your clock.
4. Take a long, thick sewing needle, (a yarn needle works best) and thread your embroidery floss through. Pierce the folded pointy end of the folded tube. Color doesn't matter for the embroidery floss--it won't show.
5. Thread the floss through the first end again, creating a "knot" that will prevent the thread from slipping through. Don't pull too hard! Next, begin to sew the additional 23 pieces onto your clock.
6. Take one of your clear CDs and place the middle hole above the hole that forms naturally in the center of the starburst. This will be the back of the clock, so choose whichever side you'd like to be the back.
7. Take your battery-operated clock mechanism and place the rod that holds the hands into the starburst and clear CD holes.
8. Flip the clock over and place the other clear CD above the hole on the other side.
9. Take your pre-punched paper circle and place on the mechanism. You may be wondering why this piece is necessary...it keeps all of the parts together and allows the nut to be threaded onto the rod. The hole of the cd has too big of an opening to keep all of the parts together tightly.
10. Screw on the nut tightly. Almost done!!
11. Add your hands!
12. AND VOILA! You have a totally unique recycled atomic starburst clock that's green and swanky!!

Chủ Nhật, 18 tháng 9, 2011

Recycling and gifts for Lover: Doilies & Hearts Tied on Jars with Strings Tutorial DIY


Jenny Doh
Cut some hearts with my favorite red wool felt ...
crescendoh
Grabbed some chunky natural white string and started wrapping the doilies with hearts onto jars ...

Jenny Doh
Perfect for a Valentine's table, or to hold treats in the kitchen.
crescendoh
Happy creating. :)

Thứ Sáu, 16 tháng 9, 2011

Origami and fashion handbags: chip wrapper purse instructions


http://media.ecouterre.com/wp-content/uploads/2009/10/ecoist-candy-wrapper-bag-5.jpghttp://media.ecouterre.com/wp-content/uploads/2009/10/ecoist-candy-wrapper-bag-2.jpg
bags by ecoist

chip wrapper purse instructions


Cut each potato chip bag into 2 X 4 1/2 ” pieces. Using a rotary cutter makes it fast. I use potato chip bags, cookie packages, ramen noodle packages, anything really. I've tried some heavy plastics but they are hard to slide into each other, they want to stick. With the large potato chip bags it only takes about 20 bags to make a whole purse. (I think, don't quote me on that, that's what I tried to figure out one time.
Cut magazine pages the same size as each chip bag piece. Each piece you fold will have a piece of magazine paper in it to make it very sturdy. You do not have to have paper in each piece when you fold, the difference is the thickness of the finished bag. I've made plenty without the paper inside and you can't tell the difference.
Folding instructions for each piece can be found at www.gumwrapper.com/build.htm …….. start with #3 on the instruction sheet because your pieces are already cut to size.

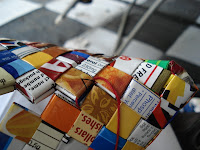
Once you have 60 wrapper pieces together you need to join them into a circle.

Take the first wrapper piece off and put into the other side by unfolding and putting the raw edges into the last chain (green piece in photo)


Follow the pictures........it's like your making the chain backwards.


I have to use a screw driver or something flat to push the piece down into the chain. Tuck the raw edges into the previous wrapper so it looks like the other wrappers in the chain.


SEWING ROWS TOGETHER

Each wrapper pice has has like a positive and negative on each side if you are looking down on top of the row. You will be fitting a positive against a negative so when you sew the rows together you have a continues up/down sewing motion.
photo of positive edge photo of negative edge


You can use a large eyes needle with a blunt tipto sew the rows together or make yourself a needle out of a credit card or some type of heavy plastic. Poke a hole in one end for the needle to tie your thread on. Just a strong knot will be fine. The size of the piece of credit card was cut 2 3/8 X 1/2. That seemed to work the best but you will need a needle to attach the zipper. I’ve tried several different kind of thread……..I don’t know that there is a wrong or right thread……..as long as it is very strong. The thread that I was using in the photos was a denim jean thread. It’s very strong and won’t break but it was so thin that it actually was like a knife and cut my wrapper. DMC floss worked fine, I found a doily crochet thread that worked. I checked into the fishing line that everyone talks about, it was catfish nylon and would not break but I can’t find any thin enough. It’s all just to thick. I’ve read lots of info of speculation on how these purses are put together……………..they are all sewn and NOT woven or folded together. I also light to use baby crochet yarn. It's a great thickness and won't break when it's pulled tight.
To begin sewing rows together….bring needle up thru any chain and back down the other side and tie a strong knot. (next 3 photos) You will weave your loose thread ends into the purse later. The beginning is the only time that you will tie your thread onto the purse. As you run out of thread, tie on with a square knot and continue sewing


Put two chains together as I described with the positive and negative. You will be sewing down thru a chain, over slightly to the right and down thru the next chain, up thru the next chain and down thru the next one. Follow the pictures………You will continue to do this until you get all the way around to where you began sewing.


Continue sewing in an up and down motion until you go all the way around. Make sure you pull the thread tight so you do not have any gaps or see the thread.


Once you go all the way around, you need to run your thread over the top of the purse rows to sew the other side of the purse. You will be sewing the inside and the ourside of your purse. Your purse will become very stiff as you pull the thread tight when sewing the chains together
photo showing running the thread over the top row to sew the other side of the purse.


add the next row.......remember to position positive to negative


SEWING THE BOTTOM


Squeeze the bottom together and start sewing. You will only be able to sew the outside of this row. There is not enough room on the inside of the purse to sew like you did on the other rows.


I can't really explain how to sew the bottom, but once you squeeze it together just start running your needle thru the rows to hold them together. It doesn't matter how many times you go around a square because you will never see the thread. The only place that you can see my thread is in the very corners. You will have to sew around the corners a couple of times to pull them tight. The bottom is harder to have a consistant sewing pattern because your sewing the positive to positive. You'll totally understand what I'm talking about once you begin sewing. :-)


Continue sewing along the bottom. You will be tucking in one wrapper square at each corner. Once you get it tucked in, it's not going anywhere because it's so tightly wedged in to the corner.
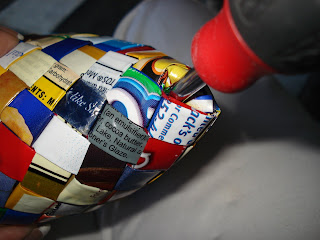


ADDING THE ZIPPER


Doesn't matter what type of zipper you buy..... just so it is long enough to go across the purse. You will cut the excess off when you are finished sewing onto the purse if it is to long.


Catch the very edge of the zipper and then run your needle down thru a chain and up the next one.


If you look really close at this picture, the needle is running down thru the chain of red wrapper with the yellow strip through it. The needle will come back up through the white chain.


This picture is a little blurry but what I'm trying to show is the needle coming back up the white chain. You will catch the edge of the zipper at every "v" around the chain.


Do both ends of the zipper like the picture. It doesn't really matter how long the zipper is because once you tuck the ends inside the purse you can cut the zipper off.


PUTTING ON THE HANDLE
Still working on the instructions for the ..............you'll just have to look at the pictures for now.


Source: candywrapperpurse.blogspot.com