Hiển thị các bài đăng có nhãn fashion. Hiển thị tất cả bài đăng
Hiển thị các bài đăng có nhãn fashion. Hiển thị tất cả bài đăng
Thứ Bảy, 17 tháng 9, 2011


Thứ Sáu, 16 tháng 9, 2011


Thứ Năm, 8 tháng 9, 2011
Gift presents for women: Ruffle shirt, refashion tutorial
Sewing patterns
Tutorial~Ruffle shirt~

I have been a big fan of Down East Basics and Shade for a few years now. I wear Wonder tees from Down East all the time. They are comfortable, modest (hide everything I need to hide and when I bend over it doesn't flash people) and since it is not baggy, I wear it under a cardigan all the time.
There is only thing I was hoping for... I wanted the same shirt, but with a little bit more feminity and flare.
Then, one day I was at a Down East store, and going through their sales rack and found this...(The folded shirt on the left is my old shirt, I am going to use this too.)


I couldn't believe my eyes, yes, I know, it was a $1!!! I asked if there are more in the back, but he said this was a left over from two summers ago, and there is no more... oh well, lucky me! I have a perfect plan for this shirt.
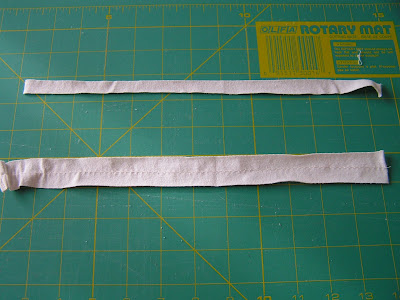
1. Cut the side of one shirt and open it up. Use the picture as a guide and cut up 6 peices of 2 1/2" X 12" and 2 peices of 1 1/4" strips.

2. Using big stitches, sew 2 1/2" strips a 1/4" from the edge. Pull one thread to make the ruffles. I made the the top of the ruffles 7" wide.
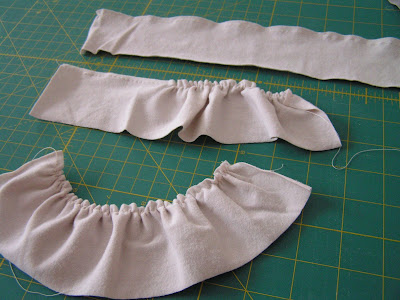
3. Sew the 1 1/4" strips together and make longer strips. Using big stitches, sew
the middle, pull one string to make ruffles.

4. First, pin the long strips around the neck line. Don't forget to leave the front part for the other ruffles.

5. Then, attach the front ruffles. Make sure that the center of the shirt and center of the ruffle lines up.

6. To add the second row of ruffles, measure 1 1/2" from the edge of the first row of ruffles and line the top of the next row to it. Sew. Repeat the process to complete the shirt.
You can stop here. The shirt look perfectly ok... but I added a corsage. If you want to do so, keep reading...

7. To make the fabric string: cut one 1/2" string and strech it. To make the corsage, cut 1" strips, sew the center with big stitches and make ruffle first.

8. Take the ruffle you made at step 7, and fold it in half.

9. To start sewing the corsage, roll up the end, and start sewing the folded part, and keep spinning and sewing...


10. There, you have a flower...Now, sew them onto your desired place and the only thing left for you to do is enjoy.

That is what I did today.

Except, Rachel kept telling people, "There is an American flag hiding!" and she tried to lift up the ruffles... shhhh, naughty girl.

Source: tearosehome.blogspot.com
Thứ Tư, 31 tháng 8, 2011
Gift presents for women: Fendi Frill tutorial
yes on the amazing oversized, billowy, ruffled frills adorning the Fall 2010 runway looks at Fendi. We immediately wanted one and just couldn’t imagine having to wait another several months to actually see these frills materialize. With some research, persistence, and umpteen botched attempts, we finally figured out a fail-proofpattern. And obviously, we’re sharing it with you!

- 2 pieces of wool felt
- 2 pin backs
- a few buttons
- a few pins
- a hot glue gun
- a sewing machine
- a pair of fabric shears
- an iron
- our frill pattern

For a fuller and longer frill, print the pattern as it is on 11″ x 17″ paper at 100%. For a smaller frill, reduce the size of the pattern and print on normal 8.5″ x 11″ paper. Carefully cut out the volute-shaped pattern, stack, and pin onto the two pieces of stacked felt. Using the pattern as a guide, cut out the felt. While keeping the two pieces of felt stacked, pull the two pointed ends taut. A ruffle will be created on one side and a straight line on the other. (Click images to enlarge)

Sew the felt together along the straight side, with a 1/4″ inseam, down to the end. Trim any extra threads. Open the frill. Spread the seam apart on the backside and press it open using the tip of a hot iron.

Run a zig zag stitch down the center of the front side of the frill. This will keep the back seam open and flat, giving the frill structure and shape. Glue or sew buttons along the front stitch. Flip the frill over and glue or sew a pin back at the top and another at the bottom.

Your Fendi-inspired frill is finito!

Pin the frill to any blouse, shirt or dress. Make it smaller, make it larger, add less buttons, add more buttons . . . make it to your liking and have fun!
Source: honestlywtf.com
Thứ Ba, 30 tháng 8, 2011
Gift presents for kids: Sweet Minky Tutorial

Gift presents for kids: Sweet Minky Tutorial

Cut 2 sides and 1 back each for your outer cape and the lining (6 pieces total).

Starting with the lining, sew down both side seams.


Then repeat with the minky outside.

Open them up and put right sides together.

Align the side seams at the neck and pin from seam to seam. Use lots of pins to keep the minky from stretching more than the cotton lining.

Then pin from the seams to the outer shoulder.

Stitch at 1/4″ seam allowance.

Now go to the bottom, making sure to keep your fabrics laying flat so they’re even, and pin from seam to seam. Sew them together.

Move to the bottom of one side, leaving a gap about 4 inches wide to turn your cape when you’re finished, pin and sew to the edge.

Do the same up the side, sewing from bottom seam to top seam.

Repeat on the other side, but don’t leave the hole to turn through.
Then I clipped all my edges with pinking shears to make sure my curves laid flat.

Turn your cape through the hole and smooth.

To help keep my lining and outer cape pieces together, I sewed down the side seams on the outside.

Take your buttons and place them on the front of your cape, measuring how big you want your closure piece to be.

I decided I wanted it 4 inches long and 2 inches wide, so I drew the approximate shape on paper, rounded the edges, and cut out 2 pieces.

With right sides together, I sewed around the outside, leaving a little 1 inch hole to turn it through, and clipped with my pinking shears.

Turn right sides out, whipstitch the hole closed, and mark your button hole.

Make a buttonhole, hand stitch the closure on one side, and attach buttons.
And you’re done!
Now on to the boots!
For each boot, cut 2 uppers, 2 boot pieces, and 1 sole.
Take your uppers, fold right sides together, and sew across the straight end.

Lay out your boot parts. Mine are 3.5 inches wide, so I measured .75″ from the top and made a mark at 1″, 2″, and 3″ for my elastic loops.

I cut pieces of elastic (I keep the elastic that comes tied on shoes, and that’s what this is from!) 2″ long. Fold them in half, and sew to the lining with the ends of the elastic matching the raw edge of the lining piece.

Take the minky outer piece and with right sides together, pin and sew the 2 sides and the top, leaving the whole bottom open.

Turn right sides out and press with your fingers. Your elastics should be on opposite ends for the different shoes.

Roll your boot piece, lining it up with the outer side of the shoe (this will be opposite for the other shoe), making sure the elastic pieces are pointing towards the back seam.

With the right sides together, lay the boot piece on the upper, starting at the side.


Pin the pieces together, overlapping the end when you get back to the start.


Sew them together, removing the pins as you go.


You should now have your finished boot top sewn to the outer upper piece.

Turn the boot inside out so you’re looking at the boot top lining.

Take the lining upper piece, and with right sides together, put it around the boot top, matching up the back seam with the minky seam in the middle. Sew around the opening again.


Now take your sole, with the bottom facing up at you,

Turn your boot inside out, and pin the upper pieces together to keep them from shifting.

Place the minky side down on the outside of the bottom. Starting at the inside side of the shoe, sew around the perimeter,


making sure to line the edges up as you sew around.


Turn inside out and admire your work.
Sew on buttons then find some sweet little feet to warm up!

Then to create the cape, I used a 6-12m coat we have (I know, isn’t it ADORABLE?!). I laid it out flat on a piece of freezer paper.

Be aware of any unsolicited help. I promise, they only want to put your tools in their mouth!

Back to the pattern. (she wrinkled the freezer paper crawling over it, so I’m sorry it’s hard to see that top right part) Draw a line from the start of the collar to the bottom of the sleeve on each side.

Then draw a line straight across the bottom.

Now, the rest of these measurements are the one’s I used for a 12m size cape. It’s still a little big on her, and will probably fit through 24m size, but you might need to figure out your own measurements if making a bigger or smaller size.
I drew a line 3″ from the bottom line,

Then another one 1″ above the line I just drew. Then I drew a vertical line 2″ from the edge on each side.

Using a curved edge, or freehand if you’re really good, draw a curved line from the outer corner to the intersection of the first 2 lines.

Repeat on the other side. Then draw a line connecting the two, arcing down to right above the lower line.

Here’s an idea of the shape of the cape versus the shape of the coat I used to make it.

Then cut out your cape piece on the lines you drew. Fold it in half and make the sides symmetrical, just as you did with the shoes.

Keeping your piece folded in half, trace around it on a separate piece of freezer paper to make a pattern piece for the front of the cape.

The neck of the cape needs to have a scoop shape to it, so working with the full back piece first, keeping it folded in half, I measured 1″ down the straight folded middle edge, and 3″ out towards the shoulder, then connect them with a curved line.

I transferred the markings to the front pattern piece to have a reference point.

Then I made that curve deeper, using the measurements I marked, making sure to use the same point on the curved shoulder so the front and back pieces will match up perfectly.

Then cut out on your markings, and you have your cape pattern pieces!

Source: sewlikemymom.com
Be aware of any unsolicited help. I promise, they only want to put your tools in their mouth!
Back to the pattern. (she wrinkled the freezer paper crawling over it, so I’m sorry it’s hard to see that top right part) Draw a line from the start of the collar to the bottom of the sleeve on each side.
Then draw a line straight across the bottom.
Now, the rest of these measurements are the one’s I used for a 12m size cape. It’s still a little big on her, and will probably fit through 24m size, but you might need to figure out your own measurements if making a bigger or smaller size.
I drew a line 3″ from the bottom line,
Then another one 1″ above the line I just drew. Then I drew a vertical line 2″ from the edge on each side.
Using a curved edge, or freehand if you’re really good, draw a curved line from the outer corner to the intersection of the first 2 lines.
Repeat on the other side. Then draw a line connecting the two, arcing down to right above the lower line.
Here’s an idea of the shape of the cape versus the shape of the coat I used to make it.
Then cut out your cape piece on the lines you drew. Fold it in half and make the sides symmetrical, just as you did with the shoes.
Keeping your piece folded in half, trace around it on a separate piece of freezer paper to make a pattern piece for the front of the cape.
The neck of the cape needs to have a scoop shape to it, so working with the full back piece first, keeping it folded in half, I measured 1″ down the straight folded middle edge, and 3″ out towards the shoulder, then connect them with a curved line.
I transferred the markings to the front pattern piece to have a reference point.
Then I made that curve deeper, using the measurements I marked, making sure to use the same point on the curved shoulder so the front and back pieces will match up perfectly.
Then cut out on your markings, and you have your cape pattern pieces!
Source: sewlikemymom.com

Đăng ký:
Bài đăng (Atom)

