Hiển thị các bài đăng có nhãn Tutorial. Hiển thị tất cả bài đăng

Thứ Ba, 27 tháng 9, 2011

Sewing patterns:Heart Felt Pillow tutorial

I had some felt that I needed to find a purpose for from my Studio 5 appearance. So I decided to make a pillow using the same technique with the folded circles. (Sorry about the bad picture, it is the best I could do…we need some sunshine around these parts).

Thứ Hai, 26 tháng 9, 2011

Unique crafts: IY - "Perler Beads"? $0 Guarantee! with straws

up.  Make your own faux Perler Beads!  Zero cost guarantee but ... 100% quality and satisfatory...that's will depends how 'open minded' you are to my 'new idea'!

A sample of my 'creation'...it suppose to spell " i  u" but it sort of out of shape at the end...Well, I'm not a perfectionist anyway.  Just want to share with you all the 'idea',  the 'result' will be perfect if I have more patience...

Recycling paper: How to Make Book Page Medallions / Rosettes

Book Page Medallion Craft

This craft is part of the 13 Days of Halloween project. Download number templates for the project, as well as the bug template for Day 3, in the tips and supplies post. Links to all of the crafts from this project can be found in the main 13 Days of Halloween post.
Medallions, rosettes, accordion fold circles … whatever you call them, they’re a neat detail that you can use as everything from ornaments to gift embellishments. I love the look of old book pages in this craft, but you can use any paper that you’d like. I would recommend a text weight paper, as opposed to cardstock, since it’s easier to bend and fold.
 Recycling paper:  How to Make Book Page Medallions / Rosettes

Book Page Medallions

Supplied Needed
a book page or pages
a ruler
a pencil
a hot glue gun
a 1″ circle or square of cardstock
glue dots or double-sided tape


Instructions
1. Cut a 1″ wide by 11 1/2″ to 12″ long strip from the book page. You may have to use multiple strips, which you can connect together using glue dots or double-sided tape. Lay the strip flat, and using a ruler and pencil, mark the edge of the paper every 1/4″.
2. Fold the paper in an accordion fold, using the pencil marks as your guide. When finished, connect the two loose ends together using glue dots or double-sided tape, forming a circular shape. Add hot glue to a 1″ circle or square of cardstock.
3. Immediately place the piece of cardstock over the center of the back side of the medallion. Hold in place (watch your fngers – that glue is hot!) for 30 seconds or so, until the glue begins to cool and the cardstock is firmly attached.
4. Add the calendar number to the front of the medallion using glue dots or double-sided tape.

Food gifts: how to make kite cookiesa

I have a to-do list and a cannot wait to-do list.  These were on the cannot wait list.  I’ve been dreaming of  cute little kite cookies with cute little tails for a very long time, and finally I got around to trying them out!

Recycling paper for holiday: Awesome Paper Cone Wreath Tutorial

Today I am going to give you a very detailed, step by step tutorial on how to make this wreath.  In fact sorry if it almost feels like paper cone wreath making for dumbies, but I have had a lot of questions about this wreath so I am just trying to cover all my bases.

Flower gifts: Dahlia Felt Flowers tutorial


Flower gifts: Dahlia Felt Flowers tutorial
Gorgeous... Yes.
Cheep... Yes.
Easy... of Course!
Want to make one?
Start by cutting 3 sizes of felt squares. I cut 12 of largest, 10 of the next, and 7 of the small.


Trim your squares into petal shapes, leaving one of the large and one of the medium squares for later.
 (I just free handed it because petals aren't all the same- right?)
Cut a circle for your base (I used leftover denim, but you could use more felt or whatever.)


Fold the sides of a petal in toward the center secure to the circle with a couple stitches.


Continue all the way around keeping your petals nice and close together. (I used 11 of them.)


Start your next row by stitching the medium petals in closer to the center. Continue all the way around.
 (I used 9 petals.)


Add your smallest petals on the same way. (I had 7 around.)


Take you unused large and medium square and trim them down to circles. Then cut slits all the way around.

Stack them up (med. on large)


Stitch in the center or your flower. When you pull the stitch tight the center will pull down and all the little 'fringe' will stand up.


Wha-la! a Beautiful Felt Flower!!!
(or two or three...)


Chủ Nhật, 25 tháng 9, 2011

Embroidered pictures for home decor: spring button flowers tutoriral

LA7_0865b

Embroidered pictures for home decor: spring button flowers tutoriral

DSC_0016b


Today we are turning buttons into flowers and making a cute handmade display-piece! Enjoy :)
You will Need:
  • Buttons that feel "Flowery"
  • Neutral Fabric (mine was a fine linen colored cotton)
  • Embroidery Thread (I used a few greens for the stems & yellow for the flower centers)
  • Small Needle
  • Scissors
  • Pencil or Invisible Marker
  • An embroidery hoop to be used as a frame
Freckled_Nest_Diy
Step 1: Space out your buttons on the fabric and mark a little pencil dot where you want each one. Like the example above, make sure to leave room for the stem below each button.
Step 2: Sew on the buttons all at once with one color of thread. Visit this post for tips on how to start and end your stitching.
LA7_0865b
Step 3: Stitch a straight dashed line below each button, starting just under the button and ending at an 'invisible horizontal line'.
LA7_0904b
Step 4: Frame your fabric in an ornamental embroidery hoop, hide or trim the fabric overhang in behind (I taped mine on the back).
Step 5: Hang your new artwork :)
LA7_0988b
I hung mine above my desk at the Studio :) This project would be fun as a button swap with friends (you could even do it on a teatowel)! Try it :)
Interested in another Button Craft? Check out this Cork Frame Project :)
2

Crafts lessons: braided chain stitch tutorial

braided_chain_stitch_7 
Crafts lessons: braided chain stitch tutorial
The braided chain stitch is worked almost the same way as the heavy chain stitch. There is only a slight difference in the way the needle is taken under the existing loops, thus giving it a totally different and embossed look. It  follows a reverse pattern like the reverse chain stitch and so we work it from top to bottom.
To work this stitch, you should be aware of at least the lazy daisy stitch. Knowledge of the reverse chain stitch and heavy chain stitch will only be more helpful. I will be working over a curved stitch line.
 
braided_chain_stitch_1     braided_chain_stitch_2
Fig 1: Lay the foundation by doing a lazy daisy stitch with a slightly longer tail, and the base as point A. Fig 2: Bring the needle out through B and take it under the tail of the lazy daisy without plucking the fabric.
   
braided_chain_stitch_3 braided_chain_stitch_4
Fig 3: Put the needle back in B to get another loop, layering the lazy daisy from outside.
Bring the needle out through C. Take it over the outside loop and under the inside loop as illustrated. 
 Fig 4: Put the needle back in C to finish that loop.
Now Bring the needle back again through D and continue with the same procedure.
   
braided_chain_stitch_5 braided_chain_stitch_6
Fig 5: To make the taking of needle over and under the loops easier, here is a tip. Before tightening the ‘outer’ loop completely, you can take the needle under the ‘inner’ loop. Fig 6: You can then tighten the ‘outer’ loop by pulling the thread with your fingers and continue with the procedure.
   
braided_chain_stitch_7 Fig 7: A finished braided chain stitch will look like this. It has a slightly embossed finish.

Felt gifts for girls: Blingy Heart Hair Clip Tutorial &GIVEAWAY!


Felt gifts for girls: Blingy Heart Hair Clip Tutorial &GIVEAWAY!

 The giveaway for this is over now, but you can still use the tutorial to make your own! :) Or purchase one from my etsy shop!

Tonight I made some fun blinged out hair clips! 
And now Im going to share a quick tutorial with you as well as give one away to one of you!! :)

Supplies:
Felt
Plastic gem rhinestones
scissors and glue!
alligator clip
I didnt go picture happy with this one.. since its pretty easy.
Cut your heart shapes out, glue them together.
The decide on the patter you want to use with your gems, and glue them on! 
Easy peasy.
To make it more study, I glued it again to another piece of felt. 
Then cut to shape.

Attach to alligator clip
And that is it! You can make with or without a scalloped edge! :)
Here I am with one in my hair. :) I LOVE it.

Thứ Bảy, 24 tháng 9, 2011

Crafty jewelry: Friendship Bracelet, very easy Tutorial

At some point in time, a reversal of roles between mothers and daughters happen. My mother used to take me to places when I was young. Now I take her to places. It took sometime before this happened but the reversal of roles between me and Princess One occurred after 9 years - sooner than anticipated. The reversal of roles I'm referring to is her being my mentor in this crafting project. I let her walk me through all the steps to create this Lasting Friendship Bracelet tutorial, which I'm also sharing with you. I love naming projects and so this is called operation Lasting Friendship Bracelet tutorial.

Photobucket
Crafty jewelry:   Friendship Bracelet, very easy Tutorial
Materials needed:
Beads with large openings
Hemp cord
Tape (painter's tape is used in this case)
Cardboard 

Photobucket

Photobucket

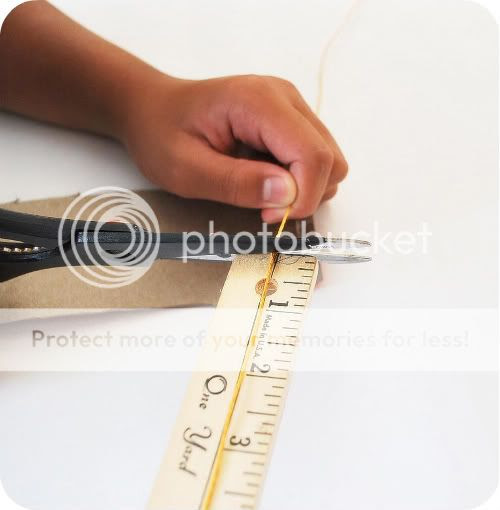
You'll need the cardboard to make a loom. Cut any cardboard into a strip about 3 inches wide and 11 inches long. Cut two slits on both ends approximately half an inch away from each other.

Photobucket

Measure your wrist.

Photobucket

Whatever the size is, add 12 inches then cut 2 strips of hemp cord with this length. For example, Princess One's wrist is 7 inches in diameter so by adding 12 inches, we have a total length of 19 inches. Cut two 19-inch strips of the hemp cord.

Photobucket

Insert the hemp cords on the slits of the loom, making sure that approximately 6 inches of the cord are left hanging.

Photobucket

Tape these cords at the back of the loom to look like this. They are named Cord 1 and Cord 2.

Photobucket

Cut another hemp cord, called Cord 3, with a length double of Cord 1. Since in this case Cord 1 is 19 inches, Cord 3 should be 38 inches. Tie the end of Cord 3 to Cord 1 with a simple knot, leaving a tail of about 6 inches, then tucking its tail on the slit for Cord 1.

Photobucket

Pass through Cord 3 under Cord 1 and Cord 2, then insert a bead.

Photobucket

Make sure that the bead stays in the middle of Cord 1 and Cord 2.

Photobucket

Pass Cord 3 over Cord 2 going towards the bead, then insert it in the bead. By now, Cord 3 should be on the left side and the bead is snug.

Photobucket

To add the next bead, pass Cord 3 under Cord 1 and Cord 2 towards the right like the step did with the green bead.

Photobucket

After that, you're ready for your next bead.

Photobucket

Here's a little pictorial summary of the steps done earlier.

Photobucket

Photobucket

When you have reached the desired length, close the bracelet by tying the ends in a knot.

Photobucket

Make a clasp using another bead that you can easily slide up and down to close or loosen the bracelet.

Photobucket

Knot all the ends of the hemp cord and now you have a Lasting Friendship bracelet.

Photobucket

These are the bracelets we made together. It took us around 20 minutes to complete these beauties and it's so worth it!

Photobucket

How about you?